Kubernetes Ahoy - Start Steering Your Container Ship
We will learn,
- Kubernetes Architecture
- Deployment of first cluster.
Kubernetes⌗
Kubernetes, also known as K8s, is an open-source container orchestration platform system for automating deployment, scaling, and management of containerized applications.
Key Features:
- Auto scaling (Scale according to traffic)
- Auto healing (Ex. Even if we kill one container, It will maintain the no. of container and will create new one.)
Application Architectures⌗
-
Monolithic:⌗
It is Solo / single structure, Whole Application Architecture on single codebase and runtime environment.
Disadvantage: If you want to change something in a part then your whole application will be affected.
-
Microservice:⌗
Single application is deployed as different microservices like, frontend, backend, DB, etc. Use different services, All services are interconnected, if you want to change in some service you can change and no need to stop whole application and neither it will affected.
Example : Kubernetes, openshift, serverless.
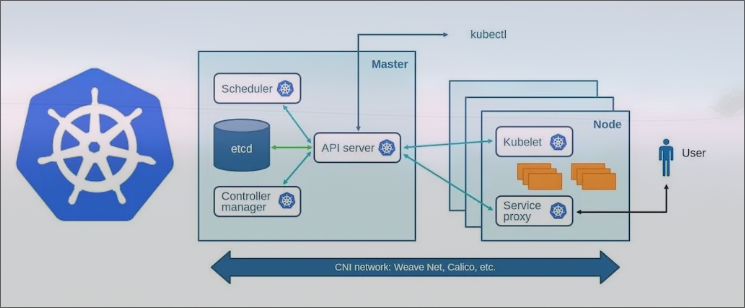
Kubernetes Architecture⌗
Kubernetes is consists of two nodes master & worker, Nodes are the physical or virtual machines that are used to run pods.
There can be only one master and multiple worker nodes.
-
Master: (Control plane)⌗
Master node often reffered to as control plane and responsible for managing and orchestrating the overall operations of the system, It serves as central control point of cluster. It interact with worker node to deploy pods.
cluster is a group of servers. In kubernetes it refers to entire set of computing resources and components that collectively make up a Kubernetes environment, like Pods, worker node, master node, services, etc.
Components:
-
Schedhuler: schedule worker node for running pods.
-
Controller manager: The main function is to maintain desired state of cluster. Checks what the workers are doing and they are up.
-
API server: Directly communicated with worker from master and vice versa.
-
etcd: Store state of kubernetes cluster in key-value data store.
-
Kubectl: Kubectl is a command-line tool used to communicate with a Kubernetes cluster’s control plane using the API server. Allows to run commands to deploy application, inspect and manage resources.
-
CNI: Container network interface.
-
Pod: This host and manage our containers that run our application.
-
-
Worker: Machine which runs containers and workloads. This is where the actual application is running.⌗
Components:
-
kubelet: Stay in worker node, Manage containers and ensures they’re running as expected. It communicates with the API server to receive information about the pods that are assigned to the node.
-
service proxy : It maintains some network rules which determines how traffic is allowed to and from the Pods. It also Allow users/clients to access application.
-
Now, Let’s run.⌗
Required tools:
-
Minikube: Used to create local cluster, works in single server using virtualiztion (docker, vmware, virtualboxdocker, vmware, virtualbox).
-
kubeadm: Used in production servers. (We will be using this)
-
CRI: Container runtime interface. (Docker, podman, etc.)
-
Servers: 2 machines, with at least 2G of ram and 2 cpu. (you can use t2.medium if you are using AWS)
After creating servers execute commands according on master and worker:
-
Install Dependencies # Execute On both the nodes (master and worker)
sudo apt update sudo apt-get install -y apt-transport-https ca-certificates curl sudo apt install docker.io -y sudo systemctl enable --now docker -
Install kubeadm # Execute On both the nodes (master and worker)
curl -fsSL "https://packages.cloud.google.com/apt/doc/apt-key.gpg" | sudo gpg --dearmor -o /etc/apt/trusted.gpg.d/kubernetes-archive-keyring.gpg echo 'deb https://packages.cloud.google.com/apt kubernetes-xenial main' | sudo tee /etc/apt/sources.list.d/kubernetes.list sudo apt update sudo apt install kubeadm=1.20.0-00 kubectl=1.20.0-00 kubelet=1.20.0-00 -y -
Now, initialize kubeadm (kubernetes) in Master node.
sudo kudeadm init -
Setup local kubeconfig # Execute on master node.
mkdir -p $HOME/.kube sudo cp -i /etc/kubernetes/admin.conf $HOME/.kube/config sudo chown $(id -u):$(id -g) $HOME/.kube/config -
Apply weave network # On master
kubectl apply -f https://github.com/weaveworks/weave/releases/download/v2.8.1/weave-daemonset-k8s.yaml -
Generate token for worker node to join # On master
sudo kubeadm token create --print-join-commandNow, copy the output and we will use it in worker node.
-
Reset the kubeadm on worker node
sudo kubeadm reset pre-flight checks -
Now, paste the token (output) of 6th step, also append
--v=5at end.Example:
sudo kubeadm join 172.31.61.228:6443 --token f4mesu.7rzk86ga48n3uydh --discovery-token-ca-cert-hash sha256:66c9863913ffdb50316e82b74f3703f73e42c4210d3a01ec7afcdbc01f677eec --v=5After successful connection you will see output similar to this:
This node has joined the cluster: * Certificate signing request was sent to apiserver and a response was received. * The kubelet was informed of the new secure connection details. -
Verify you worker node connection by running this command on Master node.
kubectl get nodes -
You can now run test application on pod. # On master
kubectl run hello-world-pod --image=busybox --restart=Never --command -- sh -c "echo 'Hello, World' && sleep 3600"And verify using
docker ps -acommand on worker node.You can even run nginx image
kubetctl run nginx --image=nginxCheck if pod is created in worker node:
kubectl get pod
So, that’s it for getting started.